使用Angular自訂元素製作通用的元件! Angular Elements使用教學與心得
什麼是 angular elements?
angular elements 可以將 angular 的元件內容打包成自訂元件-web components,能夠在脫離 angular 的框架,在其他的環境運作。目前 web components 支援大多數主流瀏覽器 (chrome、safari、opera 等等,新版 edge 也支援,但是 IE 不支援)
新增 Angular elements 專案
本文章使用目前 angular 最新的版本 9.1.0 示範(可以使用 angular 6 之後的任一個版本,操作差異不大。不過建議使用最新的 Angular 版本)
新增一個全新的 angular 專案,命名為 hello-angular-elements
ng new hello-angular-elements建立完成之後,加入 angular elements 相關套件
ng add @angular/elementsng add會自動幫處理好套件都各種修改,不用再去處理其他設定,非常方便。
使用 angular material
為了明顯襯托出 angular elements 的優點,另外安裝依賴於 angular 的 angular material。最後預期在沒有 angular 的環境使用 angular elements 執行 angular material 的相關元件
ng add @angular/material在這裡分別建立三個 component,直接複製 angular material 官網上的範例
- HeaderComponent:使用 MatToolbarModule
- CardComponent:使用 MatCardModule、MatButtonModule
- PanelComponent:使用 MatExpansionModule
設定 angular elemenets
app.module.ts
在@NgModule 中有一個bootstrap屬性
@NgModule({
  declarations: [...],
  imports: [...],
  providers: [...],
  bootstrap: [AppComponent]
})
這是宣告 Angular 啟動的時候,app module 要將什麼元件插入到 index.html 作為根元件,一般來說 CLI 會預設 AppComponent 作為根元件。但是這裡不是製做一個有架構性的專案,而是製做可以共享的元件,因此移除 bootstrao 屬性。
宣告自訂元素
export class AppModule {
  constructor(injector: Injector) {
    const customCard: any = createCustomElement(CardComponent, { injector });
    const customPanel: any = createCustomElement(PanelComponent, { injector });
    const customHeader: any = createCustomElement(HeaderComponent, { injector });
    customElements.define('custom-card', customCard);
    customElements.define('custom-panel', customPanel);
    customElements.define('custom-header', customHeader);
  }
  ngDoBootstrap() {}
}
在 app module 裡面宣告並且定義自訂元素,例如宣告一個自訂元素-custom-card,並且定義它對應到的元件是 cardComponent
最後使用ngDoBootstrap(),手動呼叫 app module 啟動。
為了檢視使用自訂元素的成果,修改 index.html
<body>
  <app-root></app-root>
</body>
將原本的 app-root 替換成我們的自訂元素
<body>
  <custom-header></custom-header>
  <custom-card></custom-card>
  <custom-panel></custom-panel>
</body>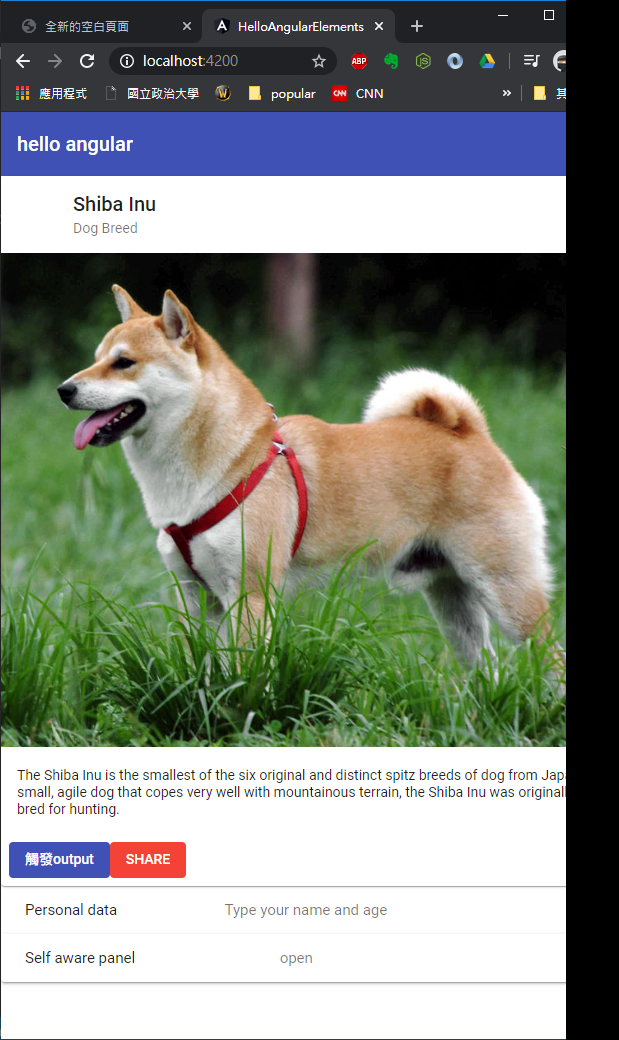
打包及合併程式
編譯檔案:
在這裡需要修改一下編譯成正式版本的設定,Angular CLI 編譯檔案的時候預設會加上 hash,避免新的檔案被快取住。但是對於製作 Angular Elements 來說,加上 hash 反而不方便,因此必須加上參數,避免在打包正是檔案的時候自動加上 hash
"build": "ng build --prod --output-hashing=none",合併檔案:
Angular CLI 在打包產生檔案的時候,最終會有三個個檔案,但是如果要給別的專案使用,一次交付三個專案則略顯麻煩。在此會將三個檔案合併成一個檔案
cat dist/hello-angular-elements/{runtime-es2015,polyfills-es2015,main-es2015}.js > all.js在這邊有兩點要特別注意:
- Angular 8 之後,打包過後的檔案會分成 es5 和 es2015 兩種版本,在這之前的版本則是沒有這種差異,所以要確認一下自己最終生成的檔案內容。
- cat 的指令只適用於
mac或linux系統,無法用在 windows 系統。如果 windows 系統要使用的話,可以打開git bash使用
接下來可以開一個全新的頁面,只要將打包後的 all.js 引入之後,就可以使用自訂元素的內容了。
另外要注意的是,在此只有打包及合併 JS 檔案,如果有額外的樣式檔案(例如:angular material 的主題樣式,或自己而外自訂的樣式),也要一併複製過去
index.html
在這裡為了顯示元件化的威力,稍微對調一下原本的顯示順序,感受一下變化
<!DOCTYPE html>
<html lang="en">
<head>
    <meta charset="UTF-8">
    <meta name="viewport" content="width=device-width, initial-scale=1.0">
    <link rel="stylesheet" href="./styles.css">
    <title>全新的空白頁面</title>
</head>
<body>
    <custom-header></custom-header>
    <custom-panel></custom-panel>
    <h1>我是全新的頁面</h1>
    <custom-card></custom-card>
    <script src="./all.js"></script>
</body>
</html>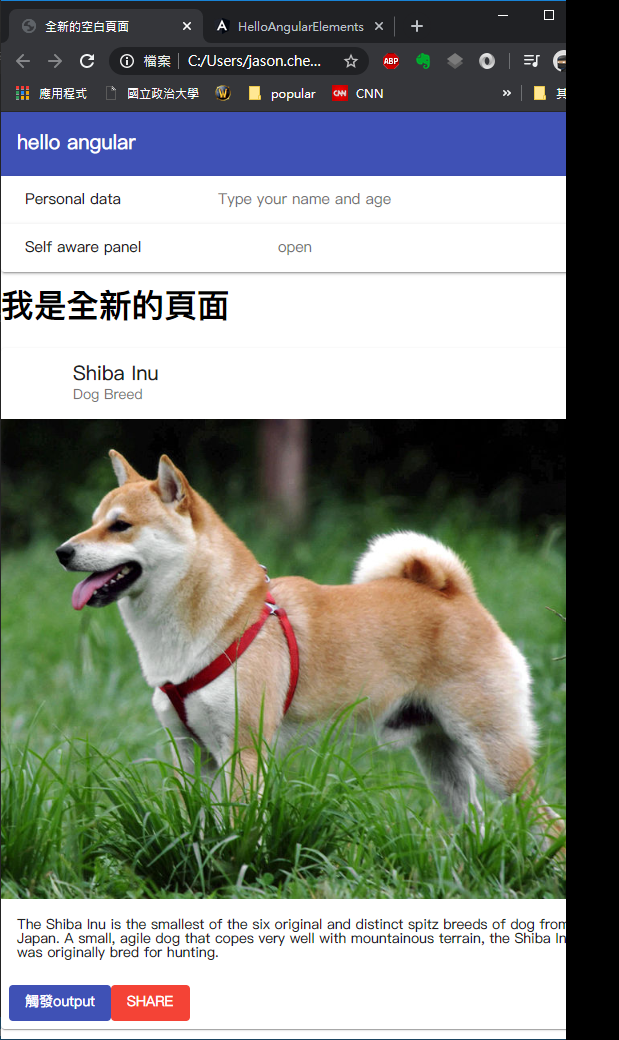
對於 Angular Elements 使用場景的想像:
Angular Elements 可以將 Angular 元件成獨立運作的檔案,並且脫離 Angular 的環境獨立運行。這樣的作法讓我想像可以運用在以下這些場景:
- 應用在老舊專案的維護上,例如使用 angularjs 或 jquery 的專案,可以使用這樣的方式漸漸替換,不必再繼續受到原有的框架限制,而難以維護。
- 應用在其他的框架上面,例如將開發完成的內容打包後,移植到其他的框架(Vue、React 等等)使用,不必重新改寫。
進階議題:自訂元素的元件互動(Input、Output)
Angular 的元件之間,可以透過 Input 和 Output 等方法向元件輸入資料、輸出方法等等,但是使用自訂元素之後,在沒有 Angular 的環境下,要如何讓元件之間進行互動呢?
首先先說結論:方法是差不多的,在自訂元素中,使用方法是一樣的;在使用自訂元素的頁面,僅需做一點小修改即可。
輸入資料至自訂元素:
例如在深色的 header component 部分,標題要從外部輸入
header.component.ts
使用原本的 input,如果沒有輸入任何值,就使用 hello angular 作為預設值,標準的 Angular 的 Input 使用方法
@Input() title: string = 'hello angular';header.component.html
將 title 的值綁定上去
<mat-toolbar color="primary">
    <mat-toolbar-row>
        <span>{{title}}</span>
    </mat-toolbar-row>
</mat-toolbar>
自訂元素輸出資料:
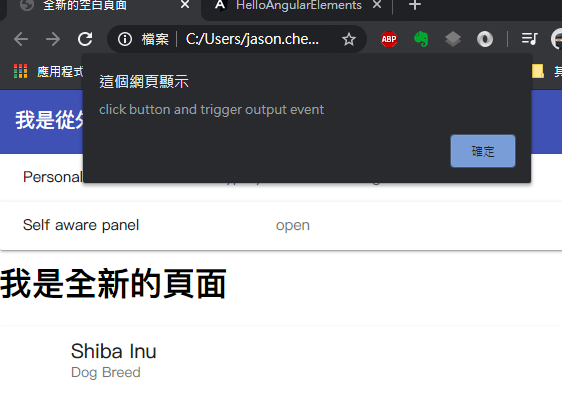
在 card component 中,狗狗照片下方的按鈕,深色按鈕按下去之後,要輸出事件至使用自訂元素的頁面中
card.component.ts
同樣是 Angular 的 Output 使用方法,如果點擊按鈕之後,就會觸發 triggerOutputEvent,並且將內容發送出去
@Output() triggerEvent = new EventEmitter();
constructor() {}
ngOnInit(): void {}
triggerOutputEvent() {
  const message = 'click button and trigger output event';
  this.triggerEvent.emit(message);
}
card.component.html
<mat-card class="example-card">
    <mat-card-header>
       ...
    </mat-card-header>
    <img mat-card-image src="https://material.angular.io/assets/img/examples/shiba2.jpg" alt="Photo of a Shiba Inu">
    <mat-card-content>
       ...
    </mat-card-content>
    <mat-card-actions>
        <button mat-flat-button color="primary" (click)="triggerOutputEvent()">觸發output</button>
        <button mat-flat-button color="warn">SHARE</button>
    </mat-card-actions>
</mat-card>
修改 index.html 取得自訂元素的輸入與輸出內容
<body>
    <custom-header title="我是從外部的自訂標題"></custom-header>
    <custom-panel></custom-panel>
    <h1>我是全新的頁面</h1>
    <custom-card></custom-card>
    <script src="./all.js"></script>
    <script>
        const component = document.querySelector('custom-card');
        component.addEventListener('triggerEvent', event => {alert(event.detail)});
    </script>
</body>- 輸入資料: 從 custom-header 輸入標題資料時,直接使用 title=”xxx”的方式就可以輸入資料
- 輸出資料: 使用原生的 javascript 去取得按鈕點擊下去發出的事件,首先使用 document.querySelector()取得自訂元素,再使用 addEventListener()去監聽 triggerEvent 事件
在這裡要特別注意的是,要注意JS載入的順序,要 angular elements 的元素先載入之後,document.querySelector()才有辦法取得,如果不確定順序,可以將 script 放到最後載入或是包裝成獨立的檔案,使用defer的方法引入,確保可以讀取得到。
重新整理頁面,看到從外部輸入的自訂標題
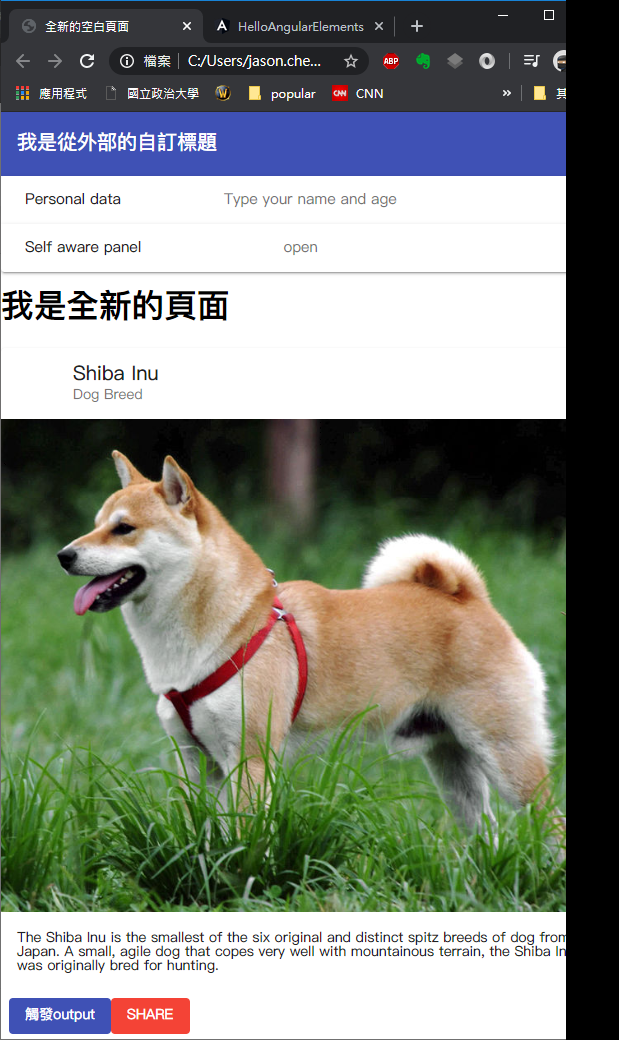
點擊按鈕,看到 addEventListener 監聽到 output 的事件
範例檔案
範例檔案放在Github上面,歡迎使用與討論